Creating Scheduled Lambda Invocations Using Step Functions
Learn how to schedule AWS Lambda functions using Step Functions in this step-by-step guide.

Have you ever wanted to schedule a Lambda function to run at a specific time in the future? AWS Step Functions allow you to do just that, giving you the ability to create workflows that coordinate multiple Lambda functions and other AWS services. In this blog post, we will explore how to set up a Step Function that triggers a Lambda function at a specified time point in the future, giving you greater control and flexibility in your AWS deployments.
Creating a new step function can seem like a daunting task, but with the right guidance, it can be a breeze. In this blog post, we will cover the step-by-step process of creating a new step function in AWS.
Creating a Step Function
To begin, you need to login to your AWS console. If you do not have an AWS account, you will need to sign up for one.
Once you are logged in, navigate to the AWS Step Functions services page. You can do this by typing “Step Functions” in the AWS search bar or by going to the “Services” dropdown menu and selecting “Step Functions” under “Management & Governance”.
Once you are on the AWS Step Functions services page, click on “State Machines”. This will take you to a list of all the state machines that you have created or that have been shared with you.
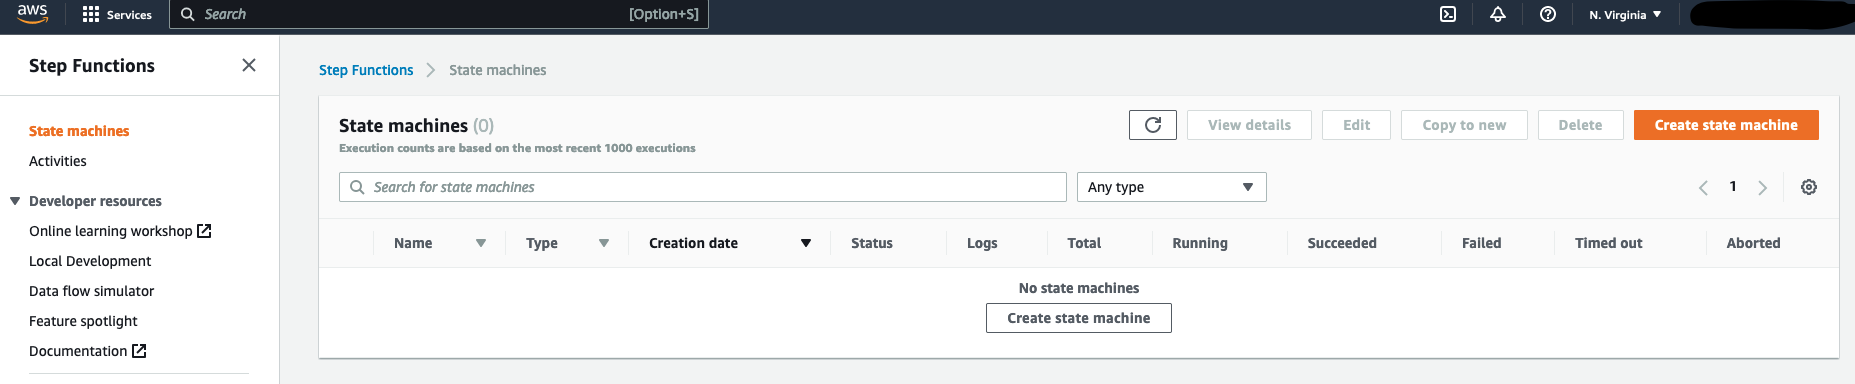
To create a new state machine, click on the “Create state machine” button. This will take you to a page where you can configure your new state machine.
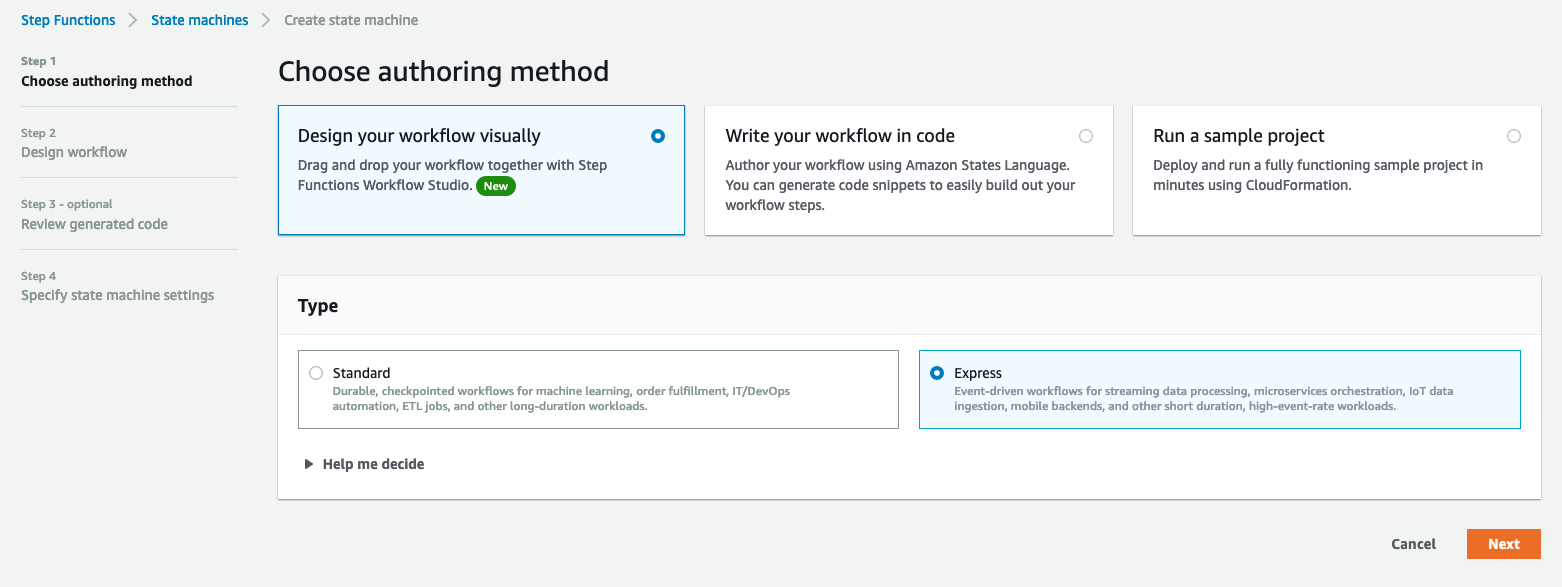
The first prompt from the wizard is to select the authoring method. In this tutorial, we are creating a simple state machine that accepts a time in the future and waits until the specified time to execute a lambda function. For simple tasks like these, the “Design your workflow visually” method, and the “Express” type is sufficient.
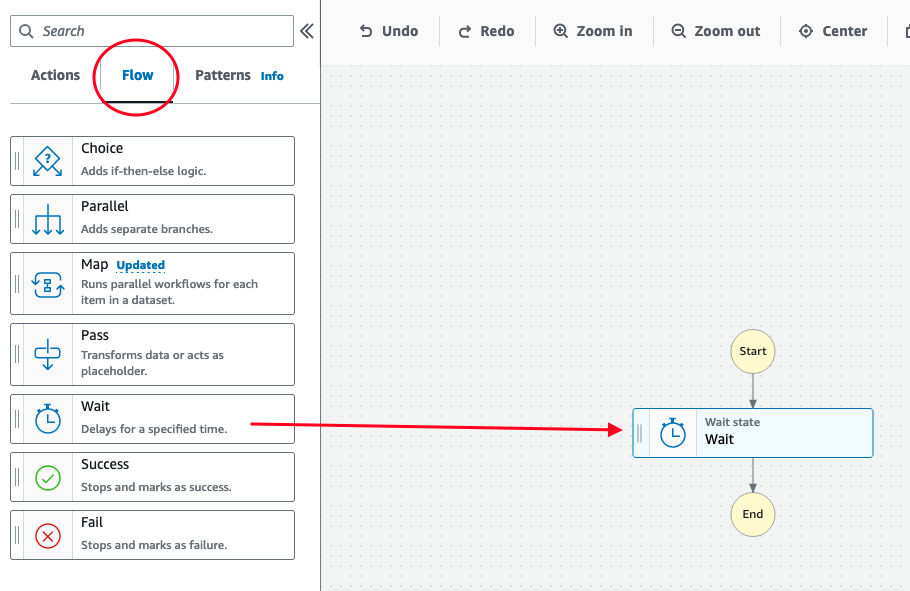
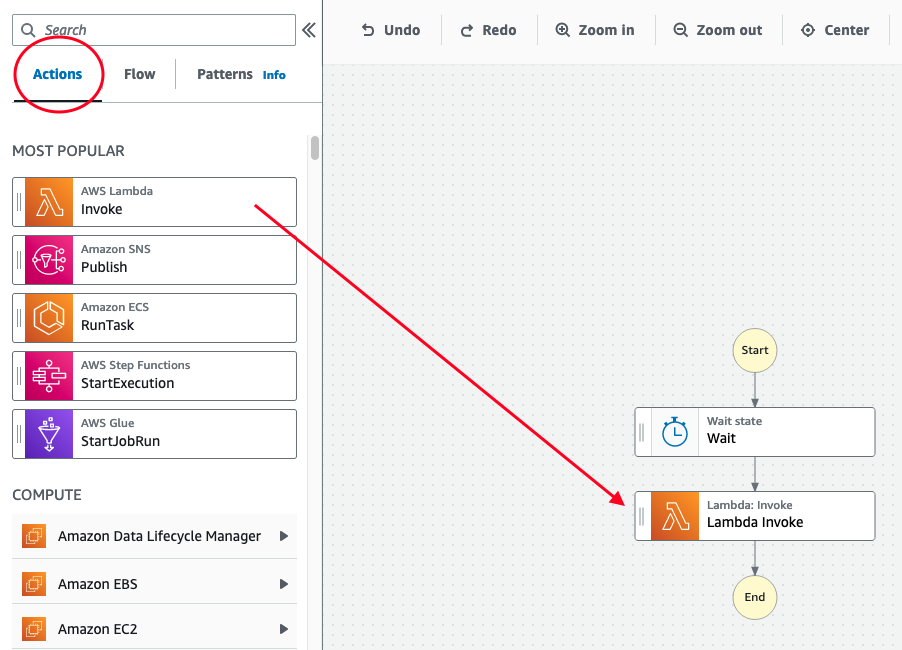
Next, we will start adding steps to our workflow. The workflow will include a wait “flow”, which will wait to execute the next step until a specified time is up. To add a wait “flow” click on the “Flow” tab in the left panel, and drag and drop Wait to your workspace.
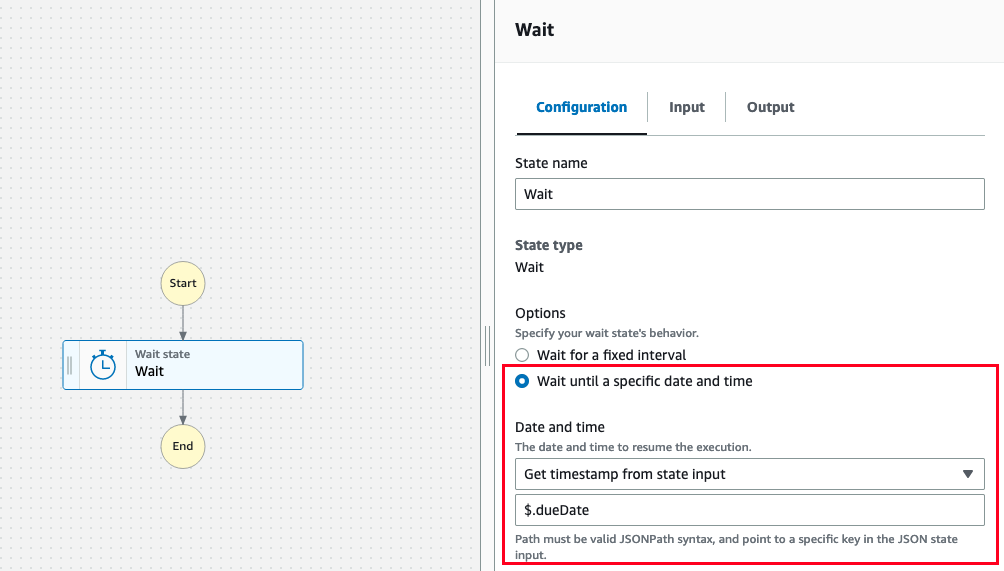
Once this step is added, we need to configure it so that it can accept a user specified time, which it will wait before executing the next step. Click on the “Wait” step to open the configuration panel on the right. Under “Options” select “Wait until a specific date and time”. Next, select “Get timestamp from state input”. In this tutorial, we will also configure an API Gateway which will pass the date and time information to our state machine. Lastly, specify the variable name which we will pass through API Gateway to our state machine. We’ll call this $.dueDate for this exercise.
Once we’ve finished confuguring our “Wait” step, we will next add a Lambda Invoke underneath it so that our lambda function will trigger after the specified date and time. Go back to y our left panel, and select the “Actions” tab. From the Actions tab, drag and drop Lambda Invoke below your wait step.
We’ll next configure our Lambda Invoke to execute a lambda function. In this tutorial, we will assume that you have a lambda function you’d like to trigger. If you do not have a lambda function, feel free to read on or follow one of our other tutorials on creating a Lambda function.
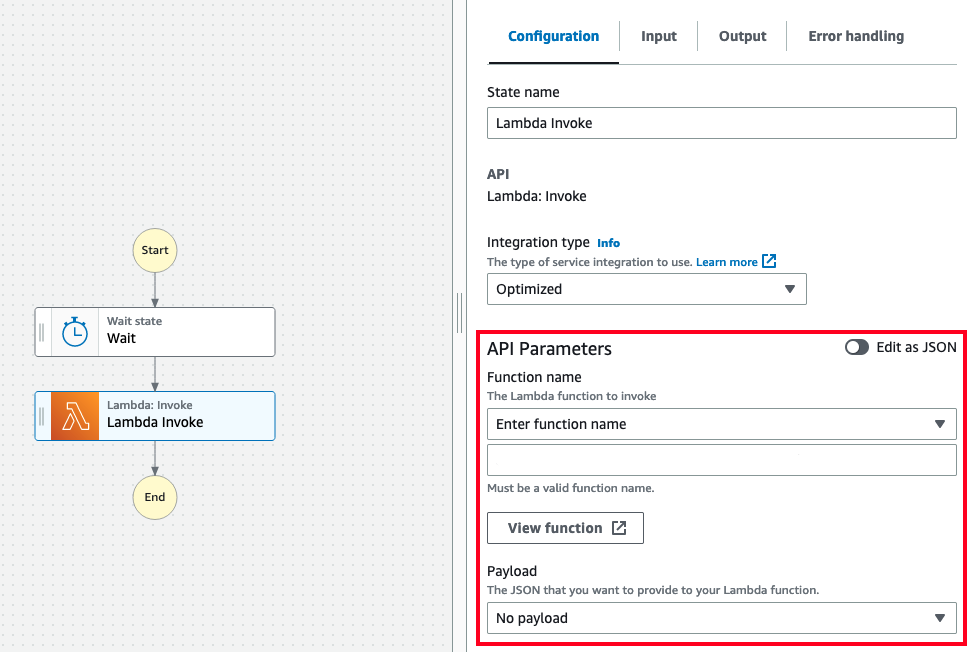
Once you’ve added a Lambda Invoke step underneath your wait step, click on the Lambda Invoke to open the configuration panel on the right. Here, we will set your function to the lambda function you wish to execute. We will also select “No payload” in this example as we just want to execute the lambda function at a specified timepoint in the future.
If you need to pass data from your API Gateway to your Lambda function, select to appropriate payload option. Additionally, you may need to specify an IAM role for your lambda function as well.
Once you have configured the Lambda Invoke step, click “Next” in the top right to move to the next step in creating a state machine. The next wizard screen will show the code for your state machine. At this point you can confirm and add additional customizations. For the purpose of this tutorial, we will just click “Next” again to specify a name and IAM execution role for this state machine.
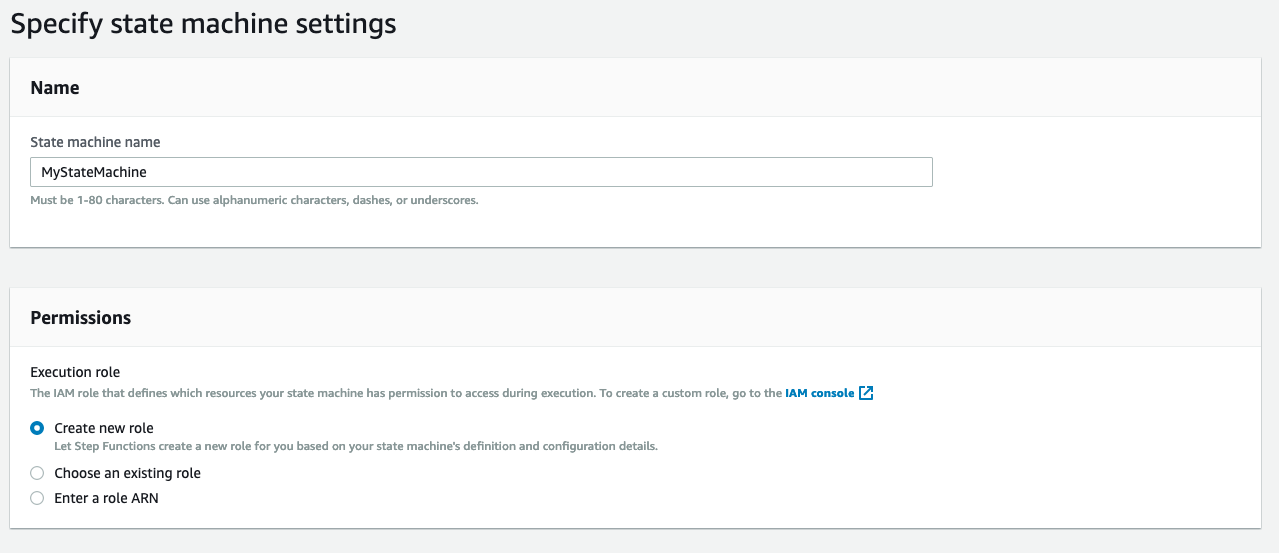
Lastly, give your state machine a descriptive name and select an IAM role. If you do not have an IAM role already created, select “Create new role”. For this tutorial, a generic role is sufficient to execute our lambda function, however, make sure to add the necessary permissions for your specific use case.
Click “Create” and now you have a new state machine ready to be invoked. We’ll next explore how we can create an API Gateway route for your state machine.
Creating an API Gateway Route for your Step Function
Now that we have created our new Step Function, we need to set up an API Gateway route to trigger it. However, in this tutorial, we will not cover the creation of an API Gateway API. Instead, we will assume that you have already created an API Gateway API and have the appropriate permissions to link it to our new Step Function. For more details on creating an API on API Gateway, check out our other tutorials.
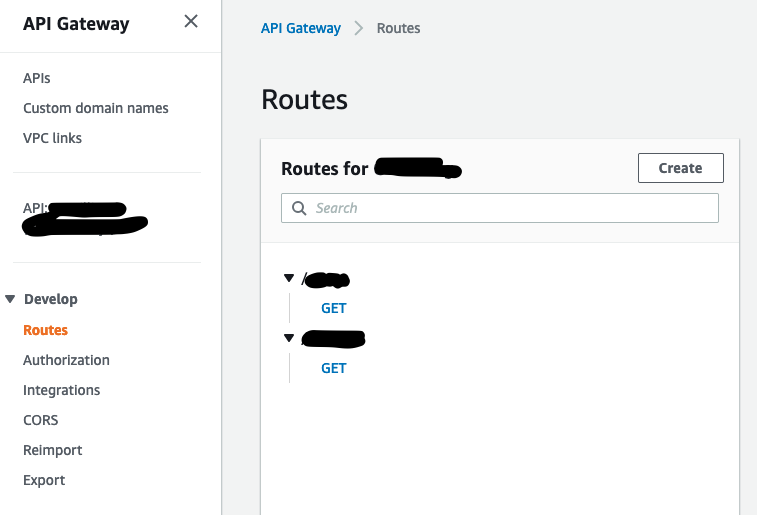
To create a new route for your API, navigate to the API Gateway service page and select your API. Next, under Develop you will select Routes. If you have existing routes, you will see a list of routes and the HTTP protocol for each route. Click on create to add a new route.
The new route we will create will be a POST request. Give your route a description name that follows naming conventions.

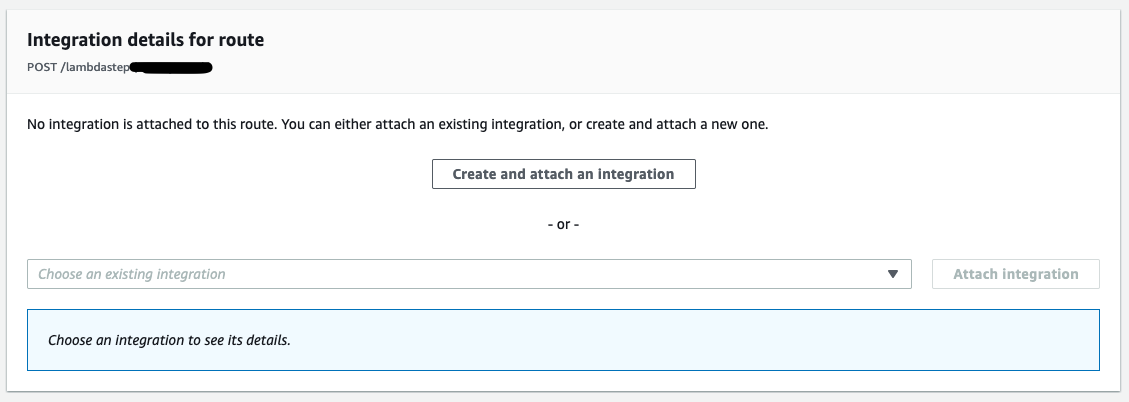
Click create, and you will see your new route added to your list of routes. Select the HTTP method, in this case POST, under the new route you created. This will open a panel to the right where you can manage integrations for this route.

Click on Attach Integration to create a new step function integration for your route. Since we haven’t created an integration for our Step Function yet, we will click Create and attach an integration.
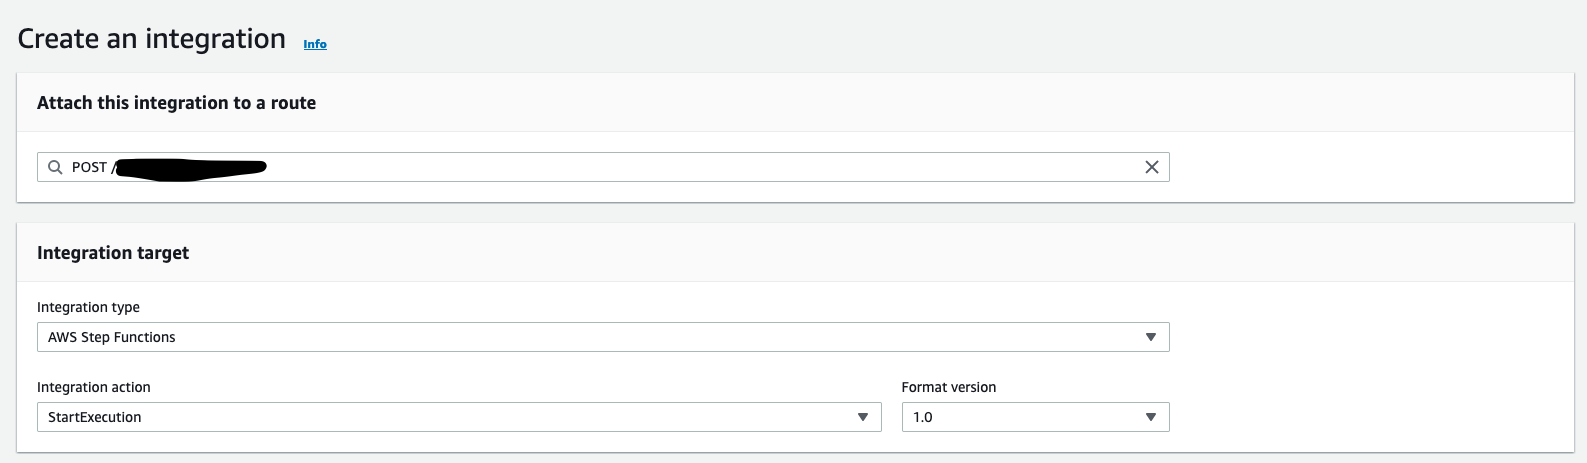
In the create integration window, select AWS Step Functions at the integration type. Next, we will select StartExecution, as we want to trigger this step function to start. Keep in mind that we will be passing a date and time in the future, which the step function will use to wait to execute the lambda function associated with the state machine.
Next, we will need to specify the ARN for our step function and IAM role used to invoke the state machine. The IAM role must grant API Gateway permission to invoke our state machine.
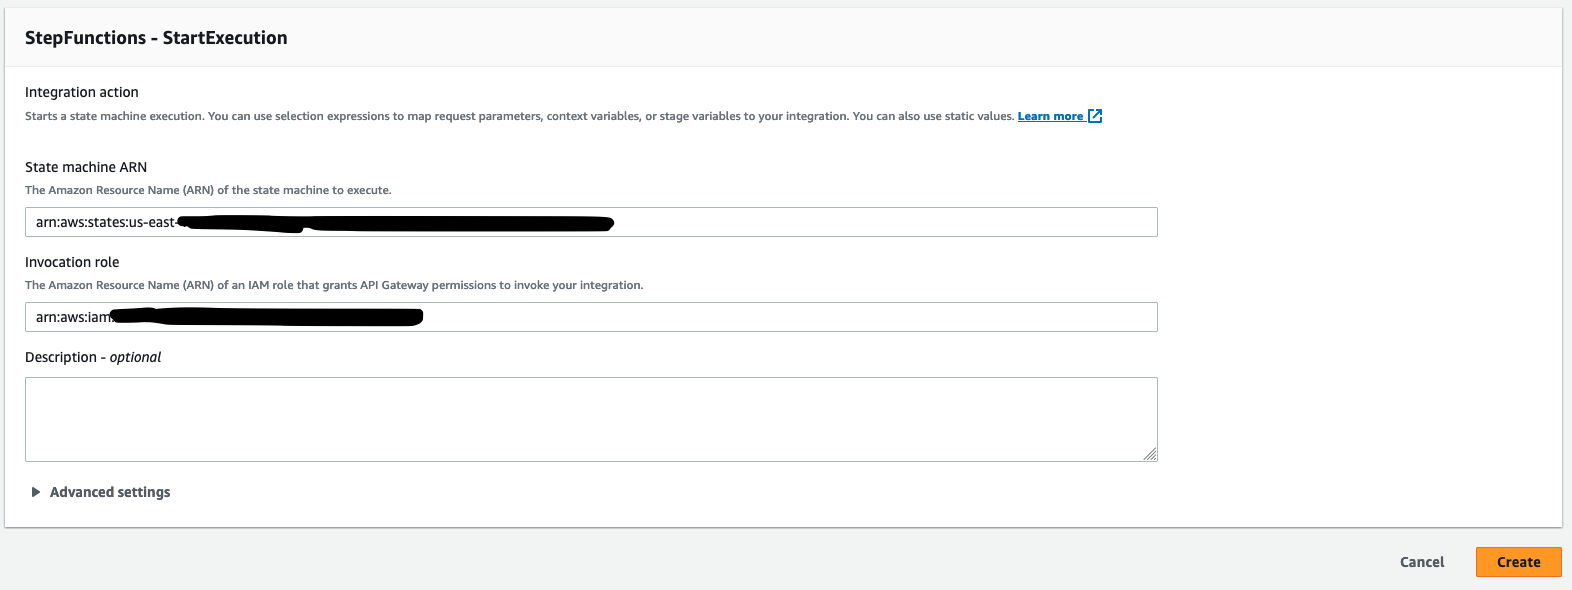
Click “Create” and now you have a new integration for an AWS Step Function that is attached to your route. You can invoke this anytime by calling your API Gateway endpoint via a POST request with dueDate set to a time point in the future.
Invoking Your Step Function
In the final section of this tutorial, we will quickly go over how to invoke your Step Function by calling your API Gateway endpoint. We will use PHP and GuzzleHttp as our example but can be applied to other languages.
To invoke your step function, we simply call the endpoint with POST passing the dueDate as a body parameter. Here’s an example:
$dt = new DateTime("+1 day"); $dt->setTimezone(new DateTimeZone('UTC')); $dueDate = $dt->format('Y-m-d\TH:i:s\Z'); $client = new \GuzzleHttp\Client(); $request = $client->post(AWS_API_GATEWAY_ENDPOINT, [ 'body' => json_encode([ 'input' => "{\"dueDate\"+\"$dueDate\"}", "stateMachineArn" => AWS_STATEMACHINE_ARN, ]), ]);
In the above example, we set the due date to 1 day in the future and use the UTC time zone. The POST request must include the dueDate we specified. If you are using an older AWS API Gateway console, you may be required to specify the state machine ARN as there was no integration method.
Conclusion
In conclusion, using an AWS Step Function to trigger a Lambda function at a specified time point in the future can be a powerful tool for automation and simplification of complex workflows. The ability to define and schedule tasks in advance can greatly reduce the need for manual intervention and increase overall efficiency. With the right configuration and implementation, this process can be easily adapted to fit the needs of any business or organization. By leveraging the power of AWS and Lambda, businesses can stay ahead of the curve and streamline their operations for maximum productivity.
How We Can Help
If you’re interested in implementing AWS Step Functions and Lambda functions for your business needs, KeyQ can help you with its experienced team of developers. Our team specializes in AWS services, including serverless technologies, and can provide customized solutions that cater to your specific requirements. We also offer cost-effective pricing and a cloud-enabled framework that allows for rapid development, prototyping, and deployment with zero management. Contact us today to learn how we can help you streamline your business processes and leverage the full potential of AWS.